Home >All PowerPoint Tutorials> PowerPoint Animation> Introduction Slides
Learn to loop presentation introduction slide. It will help you showcase your products in your Sales Presentation. Watch and learn from our step-by-step tutorial.
In some Sales or Marketing presentations some participants reach the meeting venue much ahead of the scheduled time. In such cases, all they get to see is a blank, static and boring welcome slide projected on the screen.
The same boring slides are also left up when there is a break and there are participants sitting in the meeting room staring at them.
This article shows you how to create a looping introduction slide and use it to engage your audience as they wait for the meeting to start.
You can use the looped introduction slides to showcase your product range, or highlight the concern areas of the audience or simply show ‘Welcome’ in all the languages represented by your audience.
Here is what the looping introduction looks like:
When we want to jump to the content of the presentation, all we need to do is to click on the slide. The actual presentation starts then.
Steps to create a looping introduction slide:
1.There are 2 files. 1 containing your main presentation and another with the loop presentation.
2.For the loop, decide the sequence of elements you want to loop on the slide. In our example, the sequence is as follows:
- A sheen appears across the title
- The various templates fade in, move and fade out
- The title moves up and the site name appears
- The site name fades out while the title returns to the original position
The above set of actions forms one loop. Note that the start position and the end position of the loop are identical. Make sure that all the animations are set up as ‘after previous’
3. Once you have this slide ready, go to Slide show -> Set up Slide show -> option:
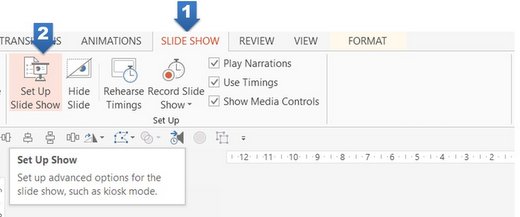
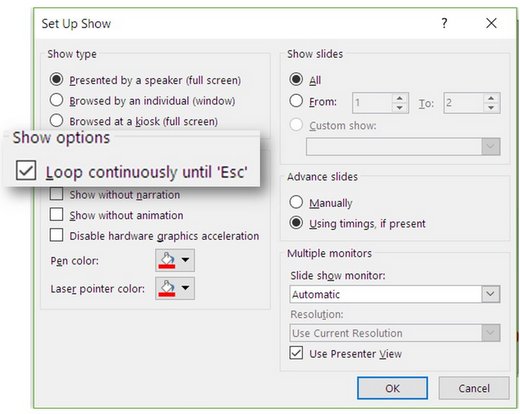
In the pop up menu, select ‘Loop continuously until Esc’ option.
4. The next step is to go to ‘Rehearse timings’ in the ribbon menu.
Allow the entire loop to finish and close the tab. You will get a Pop- up Menu that reads something like…
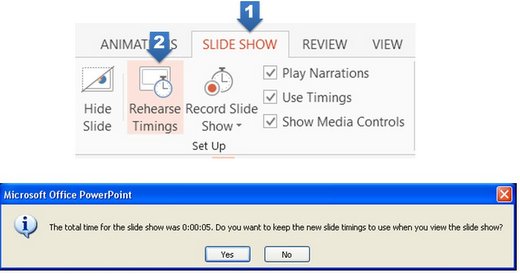
Click ‘Yes’ and Save the file.
Now the next step is to hyperlink this file to the main Presentation file.
Here are the steps to Hyperlink files:
1. In autoshapes menu, click on the rectangle shape.
2. Cover the entire slide with the rectangle
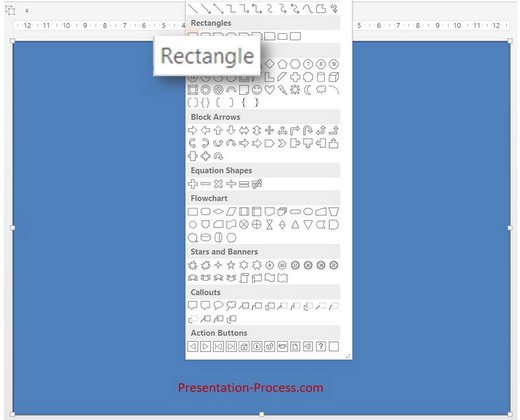
3. Right Click on the rectangle and go to Format Shape
4. In the shape Fill option that comes up, change the Transparency to 100% so that there no fill color visible.
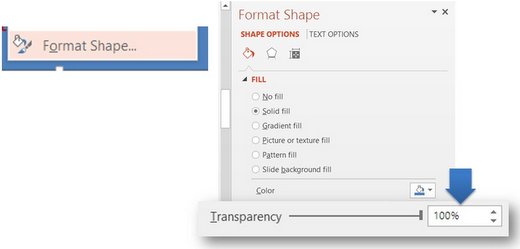
5. Next Right Click on the Rectangle and select Hyperlink
6. Hyperlink to the other presentation file
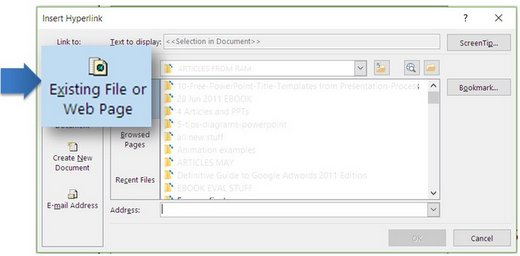
Your looping introduction is ready!
6. Make sure that the content file and the introduction loop are in the same folder. Otherwise, if you transfer the file to some other computer, the hyperlinks won’t work.
Related: Creative Agenda Slide Ideas
Note about using the product showcase loop:
You may also show the loop again during the Question – Answer session, instead of projecting just a blank slide. You can get to the loop from the content page by pressing the ‘Esc’ button in the slideshow mode. You can also choose to add light music in the background.
Recommendation:
Our site has a number of PowerPoint tutorials like the one you saw above to help you make a lasting impression on your business audience.
Please go through them and take your presentations to the next level. The site probably has the largest collection of truly advanced PowerPoint tutorials on the net.
Related: 5 Interesting Thank You Slide Ideas
Return to Top of Loop Introduction Slides Page

