
Home > All Tutorials > PowerPoint Graphics> Notepad in PowerPoint
Learn to create beautiful notepad that you can customize in PowerPoint. Follow our simple step by step instructions to create this useful icon for your business presentations.
The notepad in PowerPoint you’ll learn to create today looks like this:

The space in the notepad can be used to…
- Highlight the key message of your presentation
- List the agenda for your presentation
- Summarize the key takeaways from your discussion etc.
Let us learn how to create the icon from scratch.
Step 1: Create the pad
Go to Auto shapes menu. Using ‘rounded rectangle’ tool, draw the pad for your notepad. Fill the shape with the color of your choice and remove outline.
Step 2: Draw the bunch of papers
The next step is to make a smaller rounded rectangle and fill it with white color. This will serve as paper for your notepad. Make multiple copies of the rounded rectangle and arrange them one above the other as shown below:

When you place the stack of papers on top of the pad you get the following result:
Related: See Tutorial for Folded Paper Graphic
Step 3: Draw the wire that binds the notebook
Start with a rounded rectangle. Drag the yellow handles of the shape towards the centre. This gives a full curvature to the top edge of the rounded rectangle. Fill the shape with grey color. Click on the shape and go to Shape effects -> Presets -> Preset 2. This forms the wire for the note pad.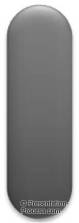
Draw a small circle underneath the bottom edge of the rounded rectangle shape you just created. Fill it with dark grey color and remove outline. This forms the hole into which the wire goes.
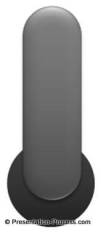
Group the two shapes together. Make multiple copies of the group and arrange the copies along the top edge of the notepad as shown below:

When you draw a dotted line and a few straight lines along the body of the paper you get your notepad ready.

Tip: If you want to learn how to create a pencil graphic in PowerPoint please follow this link.
Variations of notepad in PowerPoint:
We wish to show you some variations of notepad in PowerPoint. The diagram templates are taken from our ‘PowerPoint Graphics and Concepts CEO Pack 2’.
Here is a spiral notebook created using the technique we learnt in this article:

Here is the cover of the notebook:

Here we show the contents of the notebook – oriented horizontally:

Once you learn the basic technique you can create your own variations. All the above templates are taken from the e-learning templates section of PowerPoint CEO Pack 2.
There is no doubt that professional looking graphics like the ones we saw in the article leave a lasting impression in the minds of the audience. However, it takes a lot of time and effort to create such high quality graphics from scratch. Most business presenters don’t have the time to create such professional quality graphics for themselves.
That is why we suggest that business presenters take a look at options like the CEO Pack 2 with 815+ fully editable templates.
Just choose the template that matches your thought and replace sample text with your own text. Your business slides get ready in no time. Creating great looking business slides has never been easier.
Please browse through our diagrams collection and see how the CEO packs can change the way you create your business presentations forever.

If you found this tutorial useful, do look around our site. You will find 200+ such advanced PowerPoint tutorials.
Related: Create Stunning Medal in PowerPoint