
Home > All PowerPoint Tutorials> PowerPoint 3D Cube
Learn to make PowerPoint 3D cube in seconds. Change the perspective to suit your design needs. Watch and learn from a video tutorial
The 3D cubes you’ll learn to make today are:

Cubes have multiple applications in a presentation. For example, take a look at the following PowerPoint slide:

We stacked the cubes and wrote on them to convey our point. You can use cubes to explain your concepts by placing them in different positions. The number of uses for the shape is limited only by your imagination.
Let us see how to create a 3D cube in PowerPoint:
Step 1 : Add Rectangle Autoshape

Go over to the Autoshapes menu in Home Ribbon. Add a Rectangle shape. Hold down the Shift button while creating the Rectangle. This ensures you get a perfect Square shape.
Step 2: Set the 3D Format Options
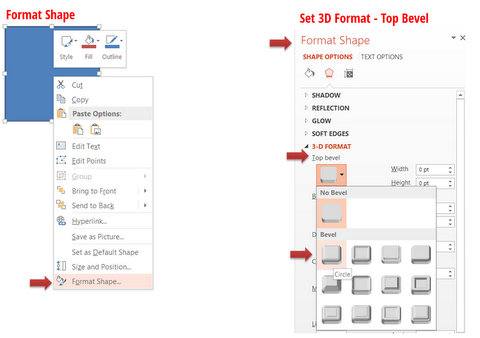


Right-click on the square shape and go to Format Shape option. The Format Shape pane will open up.
Go to Shape Options – 3D Format and set the Top Bevel to type ‘Circle’
Set the Contour Color to ‘Dark Blue, Text 2, Lighter 60%’ and enter the value ‘200’ in the Depth field.
The changes we just made will be visible only when we add a Perspective.
To do this, go to 3D-Rotation options and select the Preset ‘Perspective Left’
Your first 3D Cube is ready!
Create Different Types of Cubes

Duplicate the Cube you have just created by using the keyboard shortcut ‘Ctrl + D’.
To customize the newly created cube, Right-Click on the Cube, go to 3D-Rotation. In the Presets, set the perspective to ‘Perspective Above’.
The second cube is ready!
Duplicate the Cube you have just created by using the keyboard shortcut ‘Ctrl + D’.
To customize the newly created cube, Right-Click on the Cube, go to 3D-Rotation. In the Presets, set the perspective to ‘Perspective Contrasting Left’
The cube looks off balance. To adjust this, change the Z-Perspective to the value ‘0’.
The third and final cube is ready!

Now you will have 3 cubes that look like this:
You can vary the Perspective and 3D Depth options to create many variations of the cube.
You can also use the cubes to create an interesting diagram for your business presentation. Watch the video below to know more:
As you learn about how to make the 3D cube, a quick word on…
The power of geometric shapes in explaining a concept:
Geometric shapes are used quite extensively to explain concepts. PowerPoint diagrams made using geometric shapes are intuitive and easy to understand. When created well, these PowerPoint shapes look elegant. Take a look at some interesting geometric shapes used to explain concepts:
1. Venn diagram:

Source: Venn Diagrams from 750+ Charts & Diagrams CEO Pack
Venn diagram or circle diagram helps your audience visualize overlapping areas, territories etc.
2. Alternative way to represent Venn diagram:
Venn diagram need not be restricted just to circles. Take a look at an interesting alternative used to explain the same idea:

3. Circular shapes to represent different views:

This is a classic way to represent differing views.
So, the power of a geometric shape in explaining concepts rests in your hands as a presenter.
Point to note when creating a 3D cube:
The square we used to make the 3D cube was 3’’ in length. So, the depth of 200 points was adequate. When you make your 3D cube, please adjust the depth to match the length of the square.
The templates showcased in this article are from our 750+ PowerPoint Charts & Diagrams pack. You can take a look at the entire collection of diagram templates in PowerPoint Charts & Diagrams CEO Pack by clicking here.
Related: Create Segmented Venn Diagrams in PowerPoint
Return to Top of PowerPoint 3D Cube Page
Return to Main Power Point Tutorials Page to go through more tutorials.