
Home > All Tutorials > PowerPoint Graphics> 3D Graphics in PowerPoint
Discover a useful trick to create PowerPoint 3D graphic. Let your graphics pop out by varying the distance from the ground of selected components.
The 3D Graphics in PowerPoint you’ll learn is:
 Notice the way the steps rise from the ground in a measured fashion. The trick that makes it possible is the subject of this article. Let us create the graphic from scratch.
Create the base shape:
Go to Auto shapes menu. Under the ‘Block arrows’ option select ‘Pentagon’ and ‘Chevron’ shapes to create the following diagram:
 Make sure that the shapes have equal width and are distributed equally. Select all the pieces and group them using ‘Ctrl + G’ shortcut. The next step is to apply 3D perspective to the group.
Apply 3D perspective:
Right click on the group and go to Format shape. In the dialog box that appears, go to 3D rotation. Enter the following values for X,Y and Z axes.
 In the same ‘Format shape’ dialog box, go to 3D format. Under ‘Bevel’ go to ‘Top’ and choose a preset called ‘Cross’. Go to ‘Depth’ and add 30 Pt. The resulting 3D Steps will be as follows:
 Related:Create Stairs Diagrams in PowerPoint
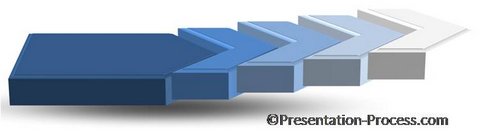
Fill the shapes with different shades of a single color to add visual interest. In the example below, we chose to color the shapes with different shades of blue:

Create the steps:
Now it is time to choose individual chevrons and increase the distance from the ground. Select the chevron that is closest to ‘Pentagon’ shape. You may have to click the chevron twice to isolate the shape. Right click and go to ‘Format shape’. Under ‘3D rotation’ – go to ‘Object position’ and increase the distance from the ground to 10 Pt. The same way increase the distance from the ground for the remaining chevrons to create the steps as follows:
 When you add shadow at the bottom, the steps look more realistic:
 When you add other design elements and relevant text, the diagram template gets completed:
You can also find this diagram ready to use in our Steps Section of PowerPoint Graphics CEO Pack 2.
[su_spacer]
[su_spacer]
Other examples that demonstrate the same technique:
We wish to show you some more examples where we used the same technique discussed in this article on 3D graphics in PowerPoint. The diagram templates are taken from our ‘PowerPoint Graphics and Concepts templates for CEOs Volume 2’. The pack has more than 815 premium charts, diagrams and graphics to help you visualize a huge range of business idea imaginable.
The following template shows 6 steps to reach the top:

The diagram template below shows an interesting variation of waterfall diagram:

Source: b>Steps Section of PowerPoint Graphics CEO Pack 2
Thus by experimenting with various 3D tools, you can create some interesting graphics for your business presentations.
Good professional graphics like the ones you saw in this article have the power to leave a lasting impression on business audience. However, such high quality diagrams take a lot of time and effort to create from scratch. Not all business presenters have the time to create such professional graphics themselves. Here is another example:

Source: Success PowerPoint Template from CEO pack 2

Source: Podiums from CEO Pack 2
That is why we came up with our PowerPoint charts and diagram templates pack for CEOs. All the templates in the pack are fully editable. Just choose the template that matches your idea, replace the sample text with your own text and your business slides get ready in no time. Creating professional presentations has never been easier.
Please browse through our diagrams collection and see how the CEO pack 2 can change the way you create your business presentations forever.
Related: Stunning Advanced 3D PowerPoint Steps Tutorial