
Home > PowerPoint Tutorials > Special Effects > PowerPoint Effect
Create a Picture of a Bobble Head Doll with any image easily. Follow our step by step PowerPoint Tutorial to create this image and use it in different presentations.
The Bobble Head Image you’ll learn to create today in PowerPoint is:
 A bobble head is a person with an unnaturally large head like a caricature. It is fun to create and you can create your own to represent:
- List of team members in a project/ heading organization etc.
- Have a fun character introduce parts of your presentation
- Present case studies creatively
You can use variations of the PowerPoint picture to represent the presenter when the presentation is sent as a forward or is a brochure as follows:

Working with the PowerPoint Image
Let us see how we can create the custom bobble head doll step by step.
Step 1: Select the right photo to use
In this tutorial, we will use the following image. If you’d like to work along with this tutorial, you can copy and paste this into your slides:
 Keep in mind when selecting your image, that it is of a good reslution and the background is white or any single uniform color. Having a low resolution photo with a complex background will usually result in an uneven image with ugly outlines.
Step 2: Crop the face and resize it
Since we will be changing the size of the face, create a duplicate copy of the image. Then crop the body in one image and crop out the face in the other. You will get 2 distinct images like this:
 We have used a blue background to show the 2 images clearly. Now resize the image containing the face and make it double the size.
 If you fit the large head now, the photo will look unreal and weird. The next step is to adjust the face to fit the shoulders.
For this, click on the PowerPoint image of the Face, go to Picture tool > Format > Picture Shape and set the shape to Oval.
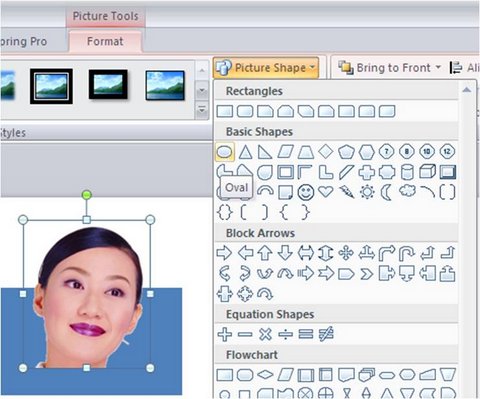 This will provide a curvature to the neck, making it easy to fit the head on to the shoulders. You can crop the neck and shoulders to make it fit better. You will get something like this:
 Step 3: Provide the finishing touches
Now it is time to make the image look like a real ‘doll’. First combine the 2 images you have by grouping them ( Ctrl + G). Then, Paste Special by using the Home > Paste > Paste Special > PNG image option. This will give you one single image.
Now right click on the Bobble head image, go to Format Picture > 3D Format tab and Set the Material to Warm Matte and the Lighting to Glow. This will provide a more plastic look to your image (like a real doll).
 You can play with the material and lighting and formatting of the PowerPoint image till you get the effect you want.
As you can see, it is quite easy and fun to play with images within PowerPoint itself.
Related: Using PowerPoint Images – Top 5 Tips
More Options for Presenters:
You can use creative options like adding a platform for the bobble head to stand on. See the tutorial to create a circular 3D platform here. If you liked this article, there are 29 more such creative options in the free 5-day e-course here. You can enroll and go through the e-course at your convenience. Enroll for free e-course >>