
Home > All Tutorials > Graphics> Waterfall Diagram in PowerPoint
Learn to create simple waterfall chart in PowerPoint. Follow our simple step by step instructions to create this useful diagram for your business presentations.
The Waterfall diagram in PowerPoint you’ll learn to create is:

Though the model is used quite extensively in software product development, it can be used in other regular business situations too. Let us learn to create the diagram from scratch.
Step 1: Create the boxes
As always, the first step in creating a diagram slide is to write the title for the slide. This allows you to plan the space for the graphics.
Once you finish entering the title for the slide, go to Auto shapes menu and pick the rectangle tool to draw the box for waterfall diagram. Make copies of the box. Create as many copies as you have stages in your chart.

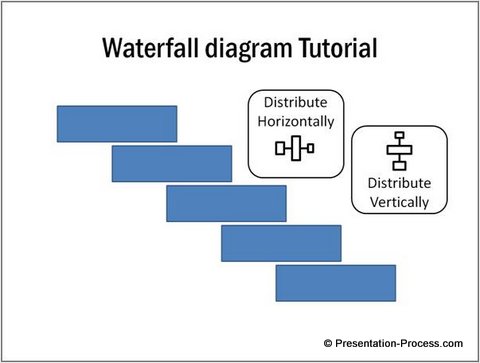
Place the last box at the final position in the diagram:

Now select all the boxes and go to Arrange -> Align -> ‘Distribute horizontally’ and ‘Distribute vertically’. This will place the boxes as steps in the waterfall chart as shown below:
Related: See more interesting uses of Align function
Step 2: Draw the arrows
Go to ‘Block Arrows’ option in auto shapes menu and pick the ‘Bent-up’ arrow. Go to Arrange-> Rotate -> Flip vertically.

Place the PowerPoint arrows next to the boxes to visualize the flow:

Make copies of the bent-up arrow and flip them vertically and horizontally to indicate the flow back:

Step 3: Give the finishing touches
The final step is to make the diagram look beautiful. Select the relevant boxes and arrows and apply quick style of your choice:

When you enter the text and add sheen to the boxes, the waterfall diagram gets complete:
Related: 25 stunning diagrams in PowerPoint
Smarter option for business presenters:
Creating graphics for a business presentation is an effort and time intensive process. The issue is – even after spending hours in polishing the graphics; you may not find the diagrams to be professional enough to reflect the brand image you represent.
That is why we came up with our PowerPoint 2 CEO Pack Bundle with 1600+ charts, graphics, graphs and diagram templates packs for CEOs’. The CEO bundle helps you visualize every business idea imaginable.
Just choose the template that matches your thought and replace the sample text with your own text. Even if you don’t find a diagram that captures your idea exactly, you can pick and stick elements from different slides and create the graphic you need in minutes. Creating professional quality business presentations has never been easier.
Here is a variation of the Consulting model from CEO Pack 2:

There can be more variations created of the same diagram with icons or with 3D effect. Here is a process diagram from CEO Pack 1:

Here is another 3D waterfall chart from CEO Pack 1

Please browse through our PowerPoint 2 CEO Pack Bundle diagrams collection now and see how the CEO packs can change the way you create your business presentations forever.
If you found this tutorial useful, do look around our site. You will find 200+ such advanced PowerPoint tutorials.
Related: Simple Process Flow Diagram Tutorial